Saturday, September 30, 2006

Advanced Figure Drawing #4

What, with the title of this class being adv. figure DRAWING, I figure that I owe you at least a few sketches. You'll finally see some drawings, but before that, how about some pictures of the rib cage? We've gotten the head primitive form down, and now we're working on the rib cage. I've added it to my ecroche, but I've still got to make a smaller version out of sculpy like I did for the head (the work never ends). You can also see the Plastilina head form on the armature. For the sketches, we start with a simple egg, soup can and teacup, then we cut them up to a more descriptive form, just like we do with the clay. That's why it's important to draw through the model, lightly placing those edges even if they're obscured and cant be seen. Enjoy!


Monday, September 25, 2006

advanced figure drawing #3

Occasionally, one might ask: "How do you draw a perfectly foreshortened character with no reference at all?" Such questions are exactly what this class is trying to address. The idea is simple: through repetition, master the 3D primitive forms of a human so that the objects can be mentally rotated and placed without the need for something to look at. In that pursuit, we have to build the primitive forms out of sculpy, so at the very least we can take these around with us, hold them up to a figure and quickly get an idea of the form without all that skin getting in the way. I spent the weekend making the head, here's the basic process:

1. Form a ball of clay as spherical as possible
2. Score a center line down the longitude
3. Score a center line down the latitude
4. Use the center line to help divide the sphere into thirds along the latitude
5. Cut out the section that goes from the bottom third to the center longitude, this is where the skull attaches to the spine
6. Add this excess to the remaining bottom section to form the chin and the front of the face
7. Hold the form by gripping the excised section. With the face pointing away from the body Cut a tapered slice from each side of the head, so that the back of the skull is wider than the front of the skull
8. Roll the face along a table to round it out

I learned a valuable trick about sculpy that is worth mentioning. You can put sculpy in the freezer to temporarily firm it up so that cuts are easier. It's always been difficult to cut a ball of clay without squishing it in the process. When the clay thaws out you can put it right back in to the freezer, just make sure it's at room temperature before baking it. I did bake it, and then I realized that the jaw was much longer than it should have been. Unfortunately, that meant I had to take a hack saw to my perfectly modeled and sanded form. It was painstaking. After almost an entire can of spray paint and a few packages of sandpaper, here's the final product:


Friday, September 22, 2006

My Pet Spider...has moved out


If you saw the previous post, I had a giant golden orb weaver spider living on my porch over the summer. Her web pretty much blocked the door, but I was willing to put up with it because I wanted to see how big this thing would get. Well, unfortunately not everyone in my house likes spiders, so the spider had to move out today. I picked it up with a stick and moved it to a tree in the backyard. Hopefully it will stick around so I can continue to check back in on it.

Thursday, September 21, 2006

Advanced Figure Drawing #2


The armature is complete! After much $ and even more work I think I've finally got the armature where I want it in preparation for constructing the muscles. To get the proportions right, I enlarged a skeleton diagram on the copy machine...but didnt get around to actually measuring it until around 12:00am. Unfortunately I had made the enlargement too small, as the sculpture is supposed to be a minimum of 3 feet tall and, my copy was only 2.5 feet. It was too late to go make another enlargement, so I tried to adjust things just knowing that everything had to be a bit taller. This made things very difficult and I'm still not convinced it all worked out properly. I used my callipers to try and at least make sure the proportions were consistent, but it would have been a whole lot easier if I just had the right size diagram to form my wire on top of. I also ended up waking early so I could go buy some new galvanized pipe to accommodate the taller skeleton. Then I wrapped the larger armature wire with the smaller stuff so the clay will have something to grab on to. Finally I used epoxy putty to concrete it all together. We'll see what my professor thinks, but there's not much going back now!

Wednesday, September 20, 2006

update: JTDriggingTools


Okay, so I made some major progress last night! I'm starting to get the hang of providing custom context sensitive right click menus that can travel with the rig file. This allows me to call custom scripts without requiring the user to know how to run a script (you'd be surprised how many people still dont know how to run a script) or asking them to install a special shelf. I'd been using this technique to do the dynamic parent snapping, but last night I also moved over my IK/FK switching to rt click menus. My previous approach was to trigger the snap scripts using a selection changed scriptJob - if the user selects an IK icon, it will snap to IK mode, if they selects an FK icon, it will snap to FK mode. However, this caused some problems with undos (the scriptJobs would remain even after the rigging was undone) so with the rt. click menus it's much simpler (I also got rid of some clutter by getting rid of the icons).

Oh, I also solved the shoulder flipping issues I mentioned in the previous post. It was strange, if I rotated the hips 90 degrees, the shoulders would also rotate (this wasnt a pole vector problem either). It turned out that I just needed to fix the rotation orders of the shoulder up-vector used to drive the advanced twist. Peachy!

Monday, September 18, 2006

JTD rigging tools


I hope to use this blog to also track the progess of my auto-rigging MEL sript: JTD rigging tools. One of the main reasons that I'm developing this is that I want to help people complete their animation projects, but I just dont have time to help everyone that asks. I've tried to steer them towards other rigging tools like The Setup Machine2 or zooCST, but I dont know these tools very well so I can't expand them. With my own approach I can help when problems arise and expand the tool to add features that they request. Developing this has helped me learn a lot, but in the end I hope it helps my fellow classmates finish their projects before they graduate! Last night I finished the foot rig module. It's a lot of code, especially since it's built off of the arm rig module and includes support for the two most popular types of foot joint placement - the one that includes the heel, and the one that goes straight from the ankle to the ball of the foot. There's still much to be done, but I'm getting close to being able to release a beta version. I've got one big problem to fix with the shoulders, then I need to code the neck setup. Maybe in a week or two I'll put up a download and a few sample videos. Stay tuned!

Sunday, September 17, 2006

Headphones


So I've been doing my research on headphones. I'm looking to get some new phones worthy of my new DAP. My previous favorite pair of headphones have started shorting out, and since they fit over my ears like a vise, my head is sore after five or six hours of wearing them. I've always had my eye on a pair of Bose QC2 active noise cancelling headphones and loved their sound and comfort when I finally got a chance to hear them (thanks to Chris Henderson). However, those are a bit out of my price range (~$300) and I'm now much more interested in getting a good pair of earbud headphones. I almost put down the money for the Etymotic Research ER-6 Ioslator headphones which got a great review in MaximumPC, but was turned away when I read lots of complaints about their lack of bass. I then turned to the creative Aurvana earbuds, and at $100, they're more than I'm willing to spend so I would've had to find a real good deal to consider these babies. Once again a search of the reviews revealed that these phones got dinged on their bass reproduction. I was about to just give up and get some $30 Sony phones, but then I did a price search for some headphones I never thought I could afford so didnt even consider. Shure makes some excellent earbuds but at $100-$300 I figured there was no way I could afford them. Imagine my surprise when I saw the base model on amazon for only $70! The Shure E2C-n usually cost $100 but I can get them for $30 off with free shipping so I think I'm gonna jump on them. They're not only critically acclaimed, but normal people love them too. I can't wait!


Saturday, September 16, 2006

ITB update

Two quarters ago I led an effort to finish a short film called Inside the Box. We made a valiant effort in the 9 weeks that we had to work, but I wasnt satisfied with what we had when it was over. That's why we're taking another crack at it and making it into what it should have been. The first step is to make sure we can actually render it again. I've been working the last week on going back through our files and figuring out what kept it from rendering as quickly as it should have (we were up to 45mins a frame at one point). I've narrowed it down to the environment file, the file that had everything except the characters. Not too surprisingly, this file is a mess. There's all kinds of empty groups, history and invalid objects in this thing. So I'm in the process of rebuilding that file, going back through all of our assets and cleaning them out, and then making sure they import cleanly into this new file. Everything is done except the street (more on that later) and we're now rendering in less than 2 minutes at full resolution in mental ray. That just goes to show you what trouble you can get into if too many people aren't careful with their files. So here's a few rules that I must reinforce after fixing this file:

1. Name everything, it doesnt matter what you name it, just be consistant
2. Dont ever pass off a file without cleaning out the outliner. This especially includes showing all non-DAG objects and making sure there's nothing extra hiding in there.
3. It's just as important to name materials as it is to name objects
4. Group things together so an object made up of many parts can easily be selected with the pickwalk command (the up arrow) and moved
5. DELETE HISTORY. There's no excuse for not doing this now that maya lets you delete non-deformer history. If history nodes (they look like empty groups) dont go away with this command, delete them yourself.
6. Optimize the scene size (File->Optimize Scene Size). People are afraid to do this because it can remove things unexpectedly. However, if things dissapear with optimize scene size, it's a good indication that there's something wrong anyway
7. Dont assign materials to faces. Maya doesnt handle this well and it's a far better idea to just break an object into a few pieces so you can assign a material to the pieces instead of the faces. Then group the pieces back together.

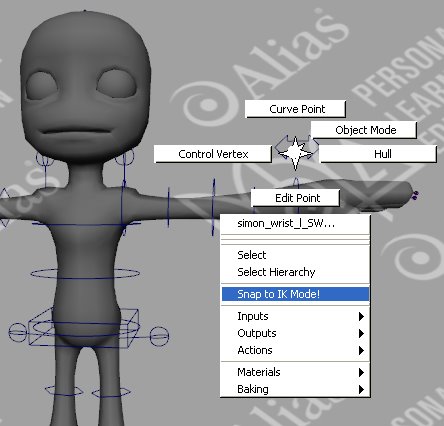
The street in the environment has been a real pain. From the beginning we were unsure what to do because it required such a big texture and we had to get so close to it that it was noticably pixelated. We kept upping the resolution, but maya has a limit and the image file size was getting out of control. Compression helped the file size, but it seemed to only make it more pixelated. That's why I suggested using multiple UV sets, that way we could tile a smaller image over the whole street and then use special "hero" tiles that we customized so things didnt look repeated. We created four different street textures, three were unique and the four was tiled. However, the UV sets didnt seem to play well with mental ray and while we finally got them working, I realized today that it's far easier to break the street into a bunch of different pieces and assign a material to each piece, rather than try to use multiple UV sets. I'm not sure why I didnt think of this before, but it makes things so much simpler. Better late than never I guess.

The same goes for characters, just break your character up into pieces to use more than one texture. You can skin the character before you break it up, and then use copy weights from the seamless character to the separated character. This will make sure the seams are all weighted evenly and wont pull apart.

Music Update

If you know me, you know that I love music. I'm pretty addicted to it, so I have to subscribe to Napster so I can get enough. For $15 a month I get unlimited music and transfers to my digital audio player, how can you beat that? Check out my new toy:


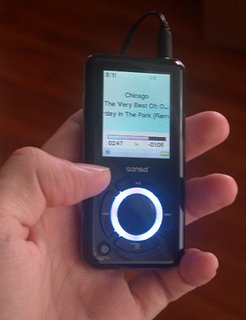
It's a sandisk sansa, probably the best DAP for the money ($180) on the market right now. It's a 6GB flash player with support for photos, videos and of course music, including music from subscription services. It can also record, and even record off of it's own FM radio. Oh and it has an expansion slot so I can put more memory on it when it fills up. It's the same size as the Ipod Nano but twice as thick. Probably the best thing about this player is that it's not an Apple product...I suppose I've never seen myself as one of the conforming masses...er...I suppose I just like what all you get for the money :-) Every now and then I'll post some music for you. You can listen to it for free if you follow the link and allow pop-ups (the player wont appear if your pop-up blocker is enabled). Here's what I'm listening to today:

Chicago -Greatest Hits
Does Anybody Really Know What Time It Is?

Frou Frou -Details
Breathe In

Cake-Comfort Eagle
Comfort Eagle

My Pet Spider

Check out the spider that lives on my porch. The thing is huge, probably one of the biggest spiders that I've seen just hanging around. It's a female Golden Orb Weaver spider. The male actually lives on the web too, but it's so small you can hardly see it. They say these things can get big enough to capture small birds, so I'm keeping it around until that happens! The trouble is that it's starting to get hard to take the trash out...

Advanced Figure Drawing #1

One of the main reasons that I started this blog is to track my progress in my Advanced Figure Drawing Class. This class involves an in-depth study into human anatomy (minus the head, hands and feet...that's a separate class). This class is going to be a real challenge for me as the work-load is infamously overwhelming. Yesterday I went out and bought the materials so that I don't get too far behind. The total came to about $120 (which is very good, since the professor estimated that it'd be rare if we could squeek by with spending less than $150) though I only bought five pounds of clay for starters and will probably buy at least five pounds every week or two. For my $120 I also bought what I needed to make the sculpture stand. This thing has to be sturdy to support the 50-80 pounds of clay it'll contain. I was proud of myself though, as the kit sold for $35 at the art store (without the lazy susan underneath) and I managed to put an almost identical one together for $19. The turntable was another $20 though, bummer.

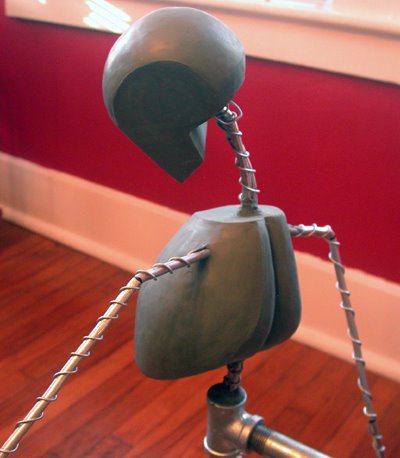
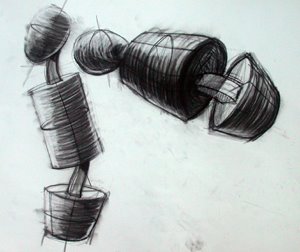
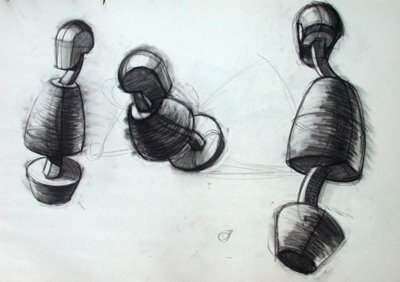
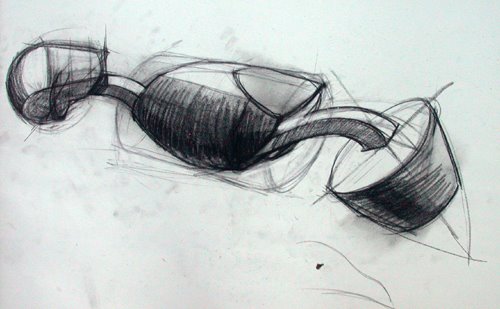
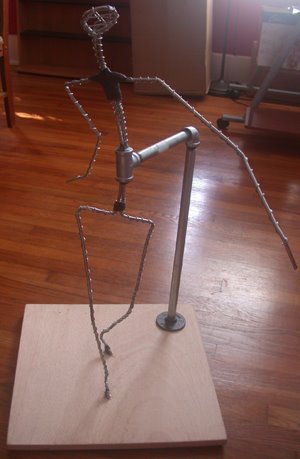
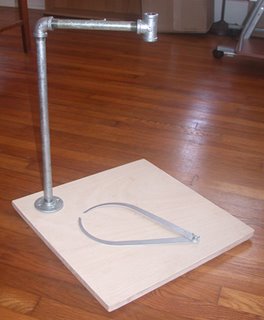
After the stand is set up I'll have to put together the armature, but since I'm not sure of the scale just yet, that'll be another post. To get the pose down, we had to make a bosetti - or a small clay sketch. It's moveable, so I'll continue posing it until I get it just right, then I'll photogrpah it and smash it up so I can use it for the real sculpture.

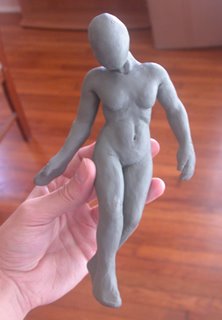
I chose a pose from the Muybridge photographs and hope it'll be dynamic enough to be interesting, but not so extreme that it looks like an action figure. The idea is to place the figure slightly off ballance so the movement is implied. It's a still pose, but it has life because it indicates the next move.

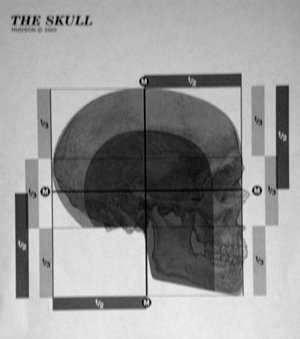
So next week we'll be getting our plastic skeletons and begin building the muscles in class. The homework will be to build those same muscle groups on this sculpture that I'm working on at home. Then we'll be drawing them from various angles. This class is all about repetition. It should be a good time.

A new chapter

I had some recent feedback that I should start chronicalling some of the things I'm doing while I'm finishing up school. This quarter should be an especially interesting one to document, so here it goes!