http://blogs.indystar.com/varvelblog/archives/2006/12/so_this_is_chri.html
I wanted to post the cartoon here, but I dont have premission, so be sure to check it out yourself.
Monday, December 25, 2006
Monday, December 18, 2006
Bummer
Well it fell through. I was trying not to get my hopes up when I got an email from the PIXAR recruiter I had met at SCAD saying that there might be an opportunity for me to intern there in January. Unfortunately, despite my best efforts I still got my hopes up. I didnt even have a chance to send them my updated portfolio when I found out today that they went with someone else. Oh well, at least I wont have to drop out of school now. I'll pick myself up and try again in March.
Friday, December 08, 2006
Adv Figure Drawing FINAL
Well school's been over for a while now, so I thought it's about time I wrapped things up. It all ended very fast. Thanks to Frappachino and Milky Way bars, I stayed up for over 48 hours to get things done, and then drove back to Indy with only two hours sleep. Fortunately, I travelled with someone who had a bit more rest, so I could doze here and there. Since I'm at home on break without internet attached to my computer, it's been harder to post. Here are a few pics from the work I turned in:


Fortunately, I landed an A in this class. I'm very proud of my grade, as it was a lot of work. Forgive me for this moment of pride, but the other work in the class wasnt even close - almost painful at times. I was the only grad student though, so maybe that's why.
In other news, I'm having to scramble a bit to update my flatbook, demo reel and website. PIXAR emailed me yesterday with some very interesting news...I'll let you know if there's anything else to report.
Anyone in Indy have a computer with maya 7.0 that I can use for a few days?
Wednesday, November 15, 2006
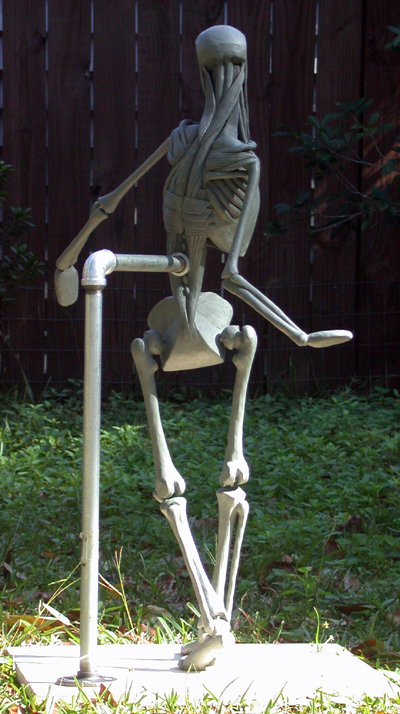
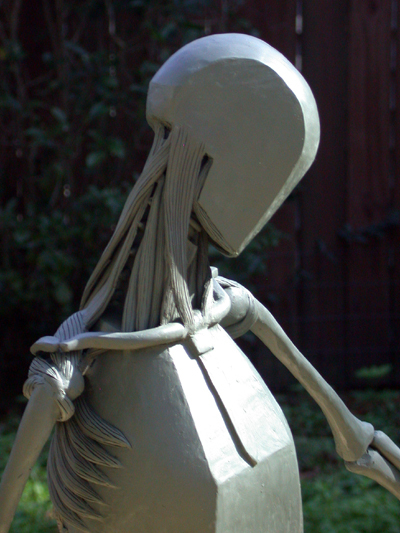
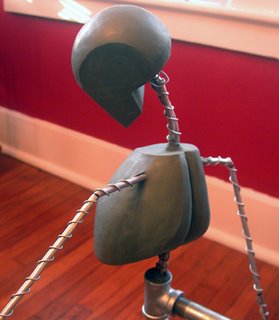
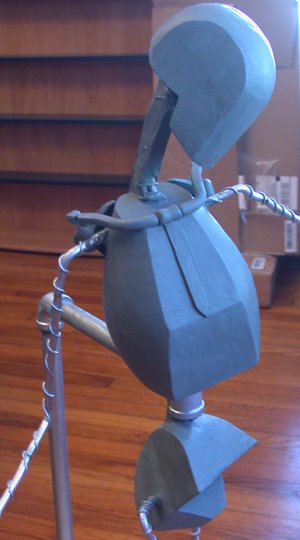
Adv Figure Drawing #7

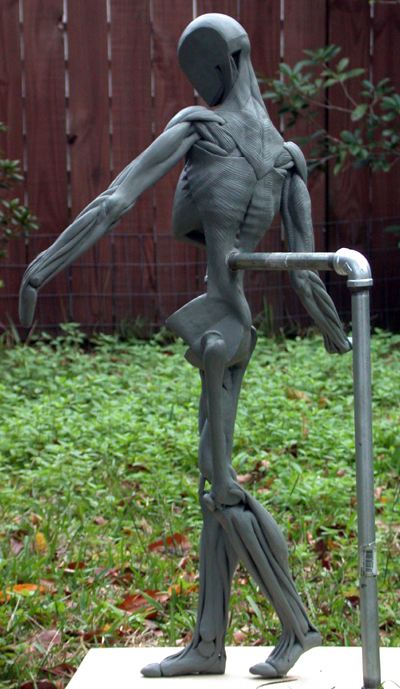
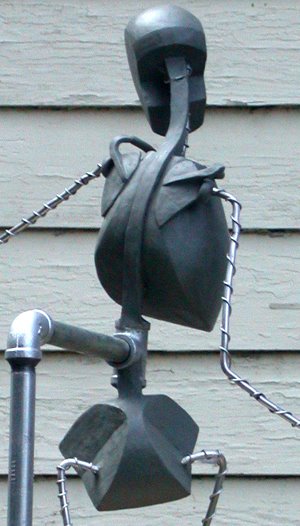
I dont have much time to write, since there's less than a week left of school, but perhaps you'd enjoy seeing some progress on the sculpture. The plastic skeleton has to be done for tomorrow, then we tear off all the clay and return it, so that's my priority for today. On the final ecroche I've finished the neck, back, chest, arms and lower legs. That leaves the upper legs, butt and all the muscle striations. I lugged it into class on Tuesday (it's probably over 50 pounds) and got some great feedback from my professor. It really does blow everyone else's away, but I knew he liked it when he asked if I was also going to turn in a CD with photos of it in progress. See, he will often patronize students by complementing their work, even though it's often pretty bad (especially compared to his work) so it's hard to know if he really likes what you've done. However, he didnt ask anyone else for photos, so I knew he was impressed. I'll let you know how the final critique goes on Tuesday. I still have all the drawings to do :-(
Monday, November 13, 2006
ITB render

ITB reality check
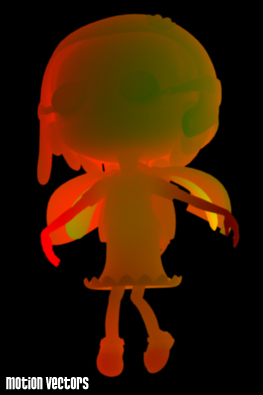
My original solution was to render the motion vectors out with a mental ray shader and use a retail plugin that could read the motion vector images and do motion blur in Adobe After Effects or Shake. We even got the shader installed on the render farm. However, the plugin costs $200, so all we could do was work with the demo version.
The neat thing that Bryan showed me is that maya has a hidden built in motion blur post-processor, that can read IFF motion vectors and motion blur our final composites. From what I can tell from my tests, the results looks just as good as what we could have gotten with the expensive plug-in.
What you do is render a low quality (but at the same resolution) maya software pass with default textures, no lighting, no raytracing, and no anit-aliasing into an IFF file. This should render very very quickly. If the motion blur was turned on and the option to save motion vectors was checked, then the motion vectors are stored in the IFF file. Then you take your high quality images that have been rendered in mental ray and fully composited (without motion blur) , and run blur2d from the command prompt using the low quality IFF images with saved motion vectors as a guide. It will read the low quality IFFs and motion blur the high quality images! The advantage is that you can get a very fast motion blur on images rendered with Mental Ray, because as we all know, Mental Ray motion blur, while very accurate, slows down our render time so much that the farm gives up. So there we have it, now we just have to get everything rendered with that extra pass. Good times.
Saturday, November 04, 2006
Victory is mine!

Hooray! I finally did well at a fencing tournament! Last weekend the fencing team went to Georgia Southern University for the Halloween Open fencing tournament. I did pretty poorly (placed 9th out of 20) early in the morning at the D and under tourney (a D-1 event), but things went well for me at the open later in the day, which was a C-1 rated event! I placed third (out of 21), which means I not only got a cool skull necklace as a trophy but I also leveled up! I went from being unrated to earning my D (skipping completely over the E). I lost to a B rated fencer, but not before scoring 10 points on him. I'm not sure why there was such a difference between the D and under and the open, but I suppose I was just finally on my game. I'm not sore anymore, but the bruises still haven't healed yet.
http://askfred.net/Results/results.php?tournament_id=2394&FREDSID=89c5329e6b24df6603d1ab2712ca6b26
Advanced Figure Drawing Update #6
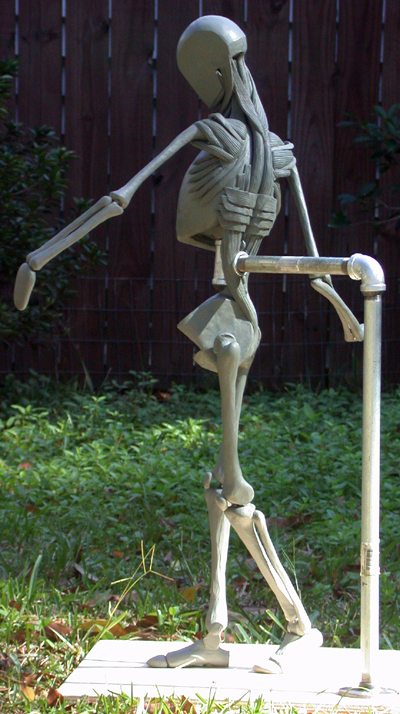

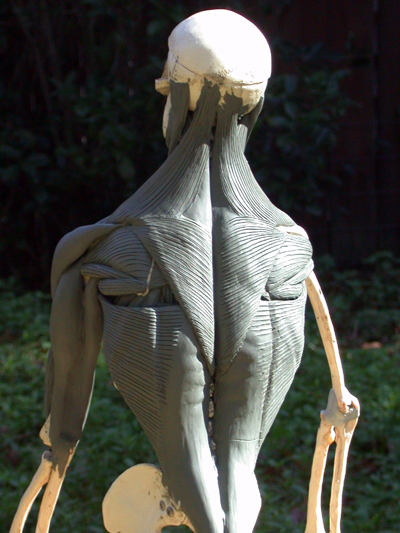
Needless to say, I've been very busy with this class. However, I decided to show some progress today because I'm about to cover up all my nice back muscles with the latissimus dorsi and the trapezius (as you can see on the plastic skeleton). There's lots left to do and only a few weeks left of class, so we'll see how things turn out and if I can actually finish all I'm supposed to. Dont forget that this is a drawing class, so I have all that left as well!
Sunday, October 22, 2006
another ITB update


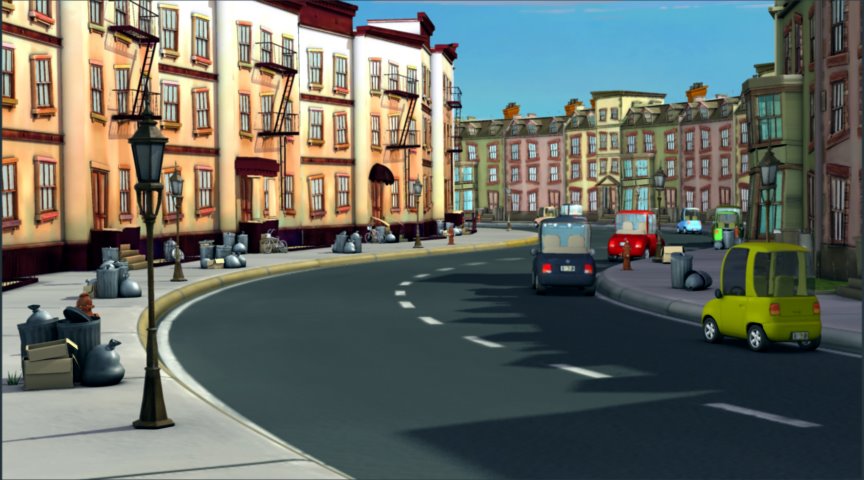

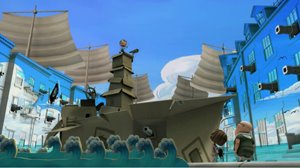
Thanks to you who posted comments on my last update. That test image was actually facing the wrong direction (if the characters were on the screen we would have seen only their backs) so that's what caused some of the lighting abnormalities. These new images should be lit properly. We consciously made the decision to have one side of the street in shadow and the other side brightly lit. It's not a theme of the film, but one of the concepts that we built into the subtext was that the kids from the "poor" side of the street are the ones with the imagination and the kid from the "rich" side of the street didnt need to use his imagination because he has always had whatever he wants. This is underscored in the dim lighting as well as the desaturated (less vibrant) colors of the rich side. But like I said, it's not a theme, so it's supposed to be subtle and just build contrast within the scene. Here I've posted the latest renders. You'll see just the beauty pass (diffuse, shadow, specular combined), the occlusion pass (soft shadows) and a test composite with the occlusion added to the beauty pass. I also added a subtle bump map to the street and DingDing finished the dirt maps. We havent broken the environment down into separate layers yet so we can tweak things individually (add depth of field, darken things as they recede, correct colors, etc.), but Chris did a final composite of the girl with her bears so that should give you an idea of the direction we're heading.
Thursday, October 19, 2006
ITB texture update
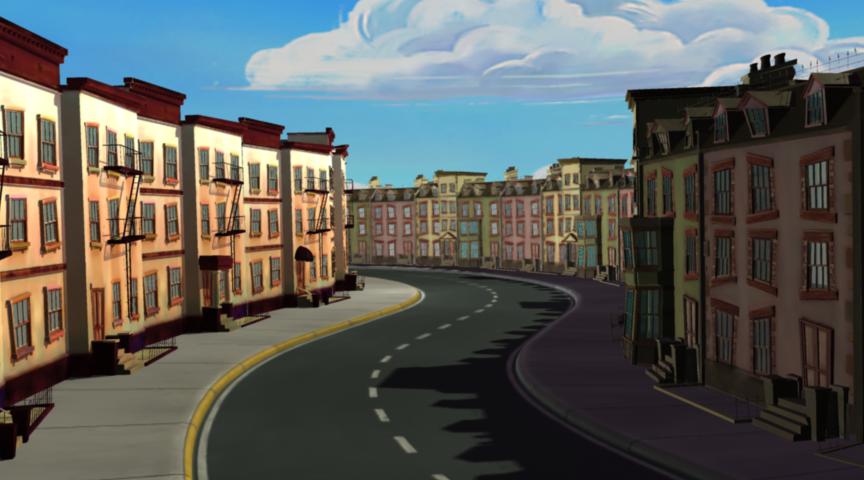
We're moving along on Inside The Box, but the textures are holding us up a bit. However, we're finally settled on the look for the rich side of the street. I like the multiple colors and the desaturated look. I hope you do too!
Saturday, October 14, 2006
Advanced Figure Drawing Update #5

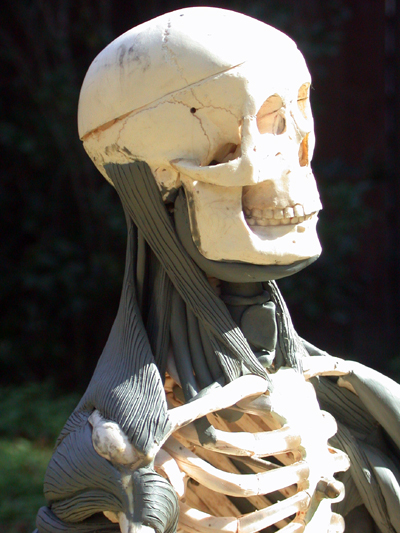
I've got midterms this week, so I've been quite busy. For Tuesday we have to have all the primitive forms done in both sculpey (miniature) and plastelina (ecroche) which includes the skull (I finally fixed the proportions of the skull, which were off in my last post), rib cage, pelvis, scapula's, and clavicles. With the primitive forms out of the way, we'll start learning the muscles and adding them to our ecroche. In class we build them on our little plastic skeleton. On Thursday we learned the supra-spenateous (sp?), which sits above the spine of the scapula and goes under the acromion process before inserting on the coracoid process. Under that is the infra-spenateous which sits below the spine of the scapula. Beneath that is the Teras minor and beneath that is the Tera major, which actually goes underneath the humorous before attaching on the front of that bone. Besides building them, we have to do a drawn rotation of the sculpture with overlays of the primitive forms, skeleton and muscles. In addition to that we have to do the overlays on top of a classical sculpture, I've chosen Bernini's Neptune fountain in Rome. I've got a lot of drawing to do before Tuesday, so off I go!


Monday, October 09, 2006
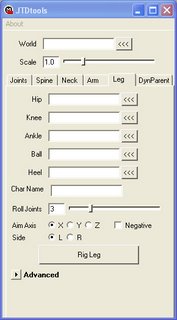
JTD rigging tools update
Since my last post, I've added and perfected the neck rig and the leg rig modules. I've also better implemented the rig primitive system so that the rig parts automatically hook themselves onto the other primitives in the scene. This saves a lot of time previously spent in the dynamic parenting tab. With a little help from Jason (www.jonhandhisdog.com) the shoulders are finally stable and the resulting rig is really solid. I still havent figured out how to do the finger setup UI, but that's really the last step before bug checking and testing. I'm also working on a simple way to connect the original bind skeleton to the rig skeleton, since the rig skeleton gets broken up into separate parts that you probably wouldnt want to bind to a mesh. It's easy to do by hand (point and orient constraints) but since I'm aiming this at a non-technical audience, I have to come up with something that only takes one or two clicks. We'll see what I can come up with after midterms, this sculpture class is killing me.

ITB update
The "Inside the Box" revision is coming along nicely. We're finally getting animation fixes and seeing some renders. Chris Henderson's new lighting alone has improved this film by 100%. There's almost no comparison between the old film and the new renders, it's like night and day :-) Kelsey's animation was excellent to begin with, but it's even better now. The same goes for DingDing's textures. He's redone the street texture and is still working out the rich side's color. We've been struggling with how the rich side should look compared to the poor side, as we've always liked the poor side and are still having trouble finding the right color ballance. Another thing that we've been struggling with is motion blur. Mental Ray's motion blur increases our render time by 300%. It gets to the point where the render farm drops frames because it takes so long on some of the slower computers (we have to motion blur at least six layers per frame, and some of those layers are an occlusion pass). To solve this I've been doing some research. This led me to the Real Smart Motion Blur plugin for After Effects or Shake. I downloaded the demo and instantly saw the power of this plugin. It can read motion vector information (which I still havent figured out) but also does an amazing job without anything extra. It gives us good motion blur without any of the render time, especially when we separate the characters layers from the background, which we're doing anyway. Once we figure out how to get maya to give us motion vector information it will be amazing. The only trouble is that the plugin costs $200, so we'll have to raise some money somehow. Speaking of which, does anyone want to give us a grant to get some professional music done for this thing? Maybe we can get the school to foot the $5000 bill.
Sunday, October 08, 2006
Mephis is burning!

I was at the 2006 North American Cup fencing tournament in Memphis this weekend on the very same day a few huge fires broke out downtown right next to our hotel. There was no need to evacuate since the worst of it was a few blocks away, but it sure was strange to walk to the convention center and see buildings still burning. There was a historic church that was completely destroyed. Even though the news said that the embers shooting into the air had caused the spread, A fireman at the tournament said that it was probably arson, as three separate unoccupied buildings were on fire on the same night and this is about the time the local gangs are doing initiations. Despite the blaze and having to share the convention center with a bunch of American Idol hopefuls, it was a good trip. I wish I had done better at the tourney, but it was still some good fencing.
Saturday, September 30, 2006
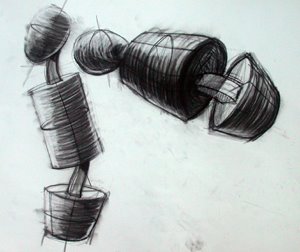
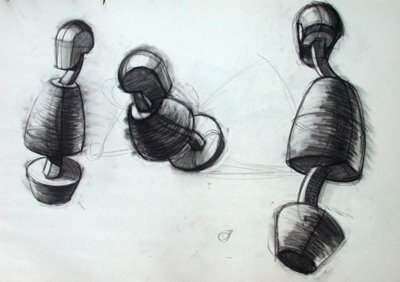
Advanced Figure Drawing #4
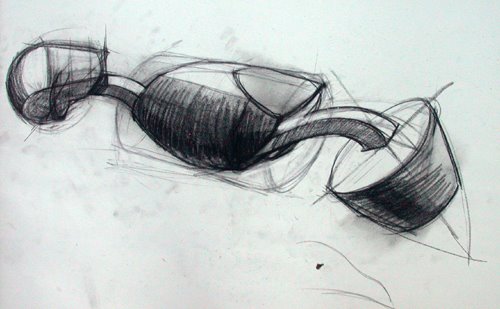
What, with the title of this class being adv. figure DRAWING, I figure that I owe you at least a few sketches. You'll finally see some drawings, but before that, how about some pictures of the rib cage? We've gotten the head primitive form down, and now we're working on the rib cage. I've added it to my ecroche, but I've still got to make a smaller version out of sculpy like I did for the head (the work never ends). You can also see the Plastilina head form on the armature. For the sketches, we start with a simple egg, soup can and teacup, then we cut them up to a more descriptive form, just like we do with the clay. That's why it's important to draw through the model, lightly placing those edges even if they're obscured and cant be seen. Enjoy!


Monday, September 25, 2006
advanced figure drawing #3
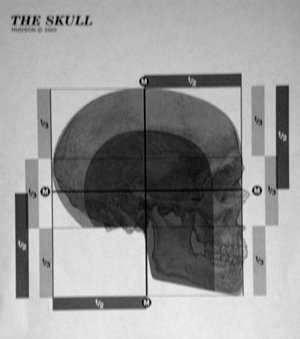
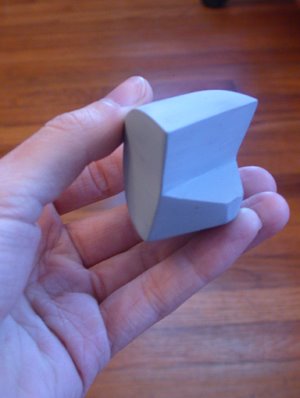
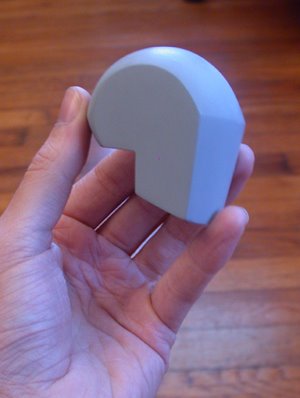
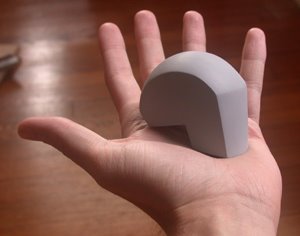
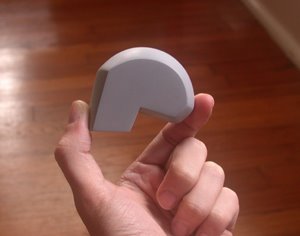
Occasionally, one might ask: "How do you draw a perfectly foreshortened character with no reference at all?" Such questions are exactly what this class is trying to address. The idea is simple: through repetition, master the 3D primitive forms of a human so that the objects can be mentally rotated and placed without the need for something to look at. In that pursuit, we have to build the primitive forms out of sculpy, so at the very least we can take these around with us, hold them up to a figure and quickly get an idea of the form without all that skin getting in the way. I spent the weekend making the head, here's the basic process:
1. Form a ball of clay as spherical as possible
2. Score a center line down the longitude
3. Score a center line down the latitude
4. Use the center line to help divide the sphere into thirds along the latitude
5. Cut out the section that goes from the bottom third to the center longitude, this is where the skull attaches to the spine
6. Add this excess to the remaining bottom section to form the chin and the front of the face
7. Hold the form by gripping the excised section. With the face pointing away from the body Cut a tapered slice from each side of the head, so that the back of the skull is wider than the front of the skull
8. Roll the face along a table to round it out
I learned a valuable trick about sculpy that is worth mentioning. You can put sculpy in the freezer to temporarily firm it up so that cuts are easier. It's always been difficult to cut a ball of clay without squishing it in the process. When the clay thaws out you can put it right back in to the freezer, just make sure it's at room temperature before baking it. I did bake it, and then I realized that the jaw was much longer than it should have been. Unfortunately, that meant I had to take a hack saw to my perfectly modeled and sanded form. It was painstaking. After almost an entire can of spray paint and a few packages of sandpaper, here's the final product:
Friday, September 22, 2006
My Pet Spider...has moved out

If you saw the previous post, I had a giant golden orb weaver spider living on my porch over the summer. Her web pretty much blocked the door, but I was willing to put up with it because I wanted to see how big this thing would get. Well, unfortunately not everyone in my house likes spiders, so the spider had to move out today. I picked it up with a stick and moved it to a tree in the backyard. Hopefully it will stick around so I can continue to check back in on it.
Thursday, September 21, 2006
Advanced Figure Drawing #2
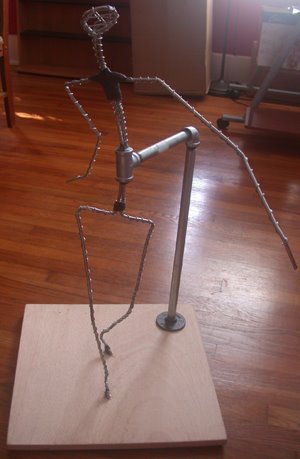
The armature is complete! After much $ and even more work I think I've finally got the armature where I want it in preparation for constructing the muscles. To get the proportions right, I enlarged a skeleton diagram on the copy machine...but didnt get around to actually measuring it until around 12:00am. Unfortunately I had made the enlargement too small, as the sculpture is supposed to be a minimum of 3 feet tall and, my copy was only 2.5 feet. It was too late to go make another enlargement, so I tried to adjust things just knowing that everything had to be a bit taller. This made things very difficult and I'm still not convinced it all worked out properly. I used my callipers to try and at least make sure the proportions were consistent, but it would have been a whole lot easier if I just had the right size diagram to form my wire on top of. I also ended up waking early so I could go buy some new galvanized pipe to accommodate the taller skeleton. Then I wrapped the larger armature wire with the smaller stuff so the clay will have something to grab on to. Finally I used epoxy putty to concrete it all together. We'll see what my professor thinks, but there's not much going back now!

Wednesday, September 20, 2006
update: JTDriggingTools
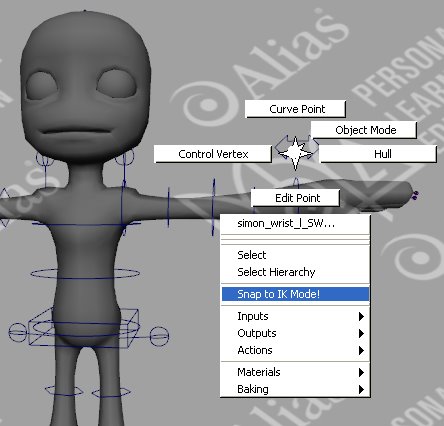
Okay, so I made some major progress last night! I'm starting to get the hang of providing custom context sensitive right click menus that can travel with the rig file. This allows me to call custom scripts without requiring the user to know how to run a script (you'd be surprised how many people still dont know how to run a script) or asking them to install a special shelf. I'd been using this technique to do the dynamic parent snapping, but last night I also moved over my IK/FK switching to rt click menus. My previous approach was to trigger the snap scripts using a selection changed scriptJob - if the user selects an IK icon, it will snap to IK mode, if they selects an FK icon, it will snap to FK mode. However, this caused some problems with undos (the scriptJobs would remain even after the rigging was undone) so with the rt. click menus it's much simpler (I also got rid of some clutter by getting rid of the icons).
Oh, I also solved the shoulder flipping issues I mentioned in the previous post. It was strange, if I rotated the hips 90 degrees, the shoulders would also rotate (this wasnt a pole vector problem either). It turned out that I just needed to fix the rotation orders of the shoulder up-vector used to drive the advanced twist. Peachy!
Monday, September 18, 2006
JTD rigging tools

I hope to use this blog to also track the progess of my auto-rigging MEL sript: JTD rigging tools. One of the main reasons that I'm developing this is that I want to help people complete their animation projects, but I just dont have time to help everyone that asks. I've tried to steer them towards other rigging tools like The Setup Machine2 or zooCST, but I dont know these tools very well so I can't expand them. With my own approach I can help when problems arise and expand the tool to add features that they request. Developing this has helped me learn a lot, but in the end I hope it helps my fellow classmates finish their projects before they graduate! Last night I finished the foot rig module. It's a lot of code, especially since it's built off of the arm rig module and includes support for the two most popular types of foot joint placement - the one that includes the heel, and the one that goes straight from the ankle to the ball of the foot. There's still much to be done, but I'm getting close to being able to release a beta version. I've got one big problem to fix with the shoulders, then I need to code the neck setup. Maybe in a week or two I'll put up a download and a few sample videos. Stay tuned!
Sunday, September 17, 2006
Headphones

So I've been doing my research on headphones. I'm looking to get some new phones worthy of my new DAP. My previous favorite pair of headphones have started shorting out, and since they fit over my ears like a vise, my head is sore after five or six hours of wearing them. I've always had my eye on a pair of Bose QC2 active noise cancelling headphones and loved their sound and comfort when I finally got a chance to hear them (thanks to Chris Henderson). However, those are a bit out of my price range (~$300) and I'm now much more interested in getting a good pair of earbud headphones. I almost put down the money for the Etymotic Research ER-6 Ioslator headphones which got a great review in MaximumPC, but was turned away when I read lots of complaints about their lack of bass. I then turned to the creative Aurvana earbuds, and at $100, they're more than I'm willing to spend so I would've had to find a real good deal to consider these babies. Once again a search of the reviews revealed that these phones got dinged on their bass reproduction. I was about to just give up and get some $30 Sony phones, but then I did a price search for some headphones I never thought I could afford so didnt even consider. Shure makes some excellent earbuds but at $100-$300 I figured there was no way I could afford them. Imagine my surprise when I saw the base model on amazon for only $70! The Shure E2C-n usually cost $100 but I can get them for $30 off with free shipping so I think I'm gonna jump on them. They're not only critically acclaimed, but normal people love them too. I can't wait!
Saturday, September 16, 2006
ITB update
Two quarters ago I led an effort to finish a short film called Inside the Box. We made a valiant effort in the 9 weeks that we had to work, but I wasnt satisfied with what we had when it was over. That's why we're taking another crack at it and making it into what it should have been. The first step is to make sure we can actually render it again. I've been working the last week on going back through our files and figuring out what kept it from rendering as quickly as it should have (we were up to 45mins a frame at one point). I've narrowed it down to the environment file, the file that had everything except the characters. Not too surprisingly, this file is a mess. There's all kinds of empty groups, history and invalid objects in this thing. So I'm in the process of rebuilding that file, going back through all of our assets and cleaning them out, and then making sure they import cleanly into this new file. Everything is done except the street (more on that later) and we're now rendering in less than 2 minutes at full resolution in mental ray. That just goes to show you what trouble you can get into if too many people aren't careful with their files. So here's a few rules that I must reinforce after fixing this file:
1. Name everything, it doesnt matter what you name it, just be consistant
2. Dont ever pass off a file without cleaning out the outliner. This especially includes showing all non-DAG objects and making sure there's nothing extra hiding in there.
3. It's just as important to name materials as it is to name objects
4. Group things together so an object made up of many parts can easily be selected with the pickwalk command (the up arrow) and moved
5. DELETE HISTORY. There's no excuse for not doing this now that maya lets you delete non-deformer history. If history nodes (they look like empty groups) dont go away with this command, delete them yourself.
6. Optimize the scene size (File->Optimize Scene Size). People are afraid to do this because it can remove things unexpectedly. However, if things dissapear with optimize scene size, it's a good indication that there's something wrong anyway
7. Dont assign materials to faces. Maya doesnt handle this well and it's a far better idea to just break an object into a few pieces so you can assign a material to the pieces instead of the faces. Then group the pieces back together.
The street in the environment has been a real pain. From the beginning we were unsure what to do because it required such a big texture and we had to get so close to it that it was noticably pixelated. We kept upping the resolution, but maya has a limit and the image file size was getting out of control. Compression helped the file size, but it seemed to only make it more pixelated. That's why I suggested using multiple UV sets, that way we could tile a smaller image over the whole street and then use special "hero" tiles that we customized so things didnt look repeated. We created four different street textures, three were unique and the four was tiled. However, the UV sets didnt seem to play well with mental ray and while we finally got them working, I realized today that it's far easier to break the street into a bunch of different pieces and assign a material to each piece, rather than try to use multiple UV sets. I'm not sure why I didnt think of this before, but it makes things so much simpler. Better late than never I guess.
The same goes for characters, just break your character up into pieces to use more than one texture. You can skin the character before you break it up, and then use copy weights from the seamless character to the separated character. This will make sure the seams are all weighted evenly and wont pull apart.
Music Update
If you know me, you know that I love music. I'm pretty addicted to it, so I have to subscribe to Napster so I can get enough. For $15 a month I get unlimited music and transfers to my digital audio player, how can you beat that? Check out my new toy:
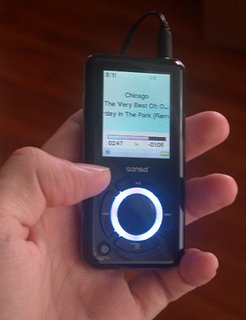
It's a sandisk sansa, probably the best DAP for the money ($180) on the market right now. It's a 6GB flash player with support for photos, videos and of course music, including music from subscription services. It can also record, and even record off of it's own FM radio. Oh and it has an expansion slot so I can put more memory on it when it fills up. It's the same size as the Ipod Nano but twice as thick. Probably the best thing about this player is that it's not an Apple product...I suppose I've never seen myself as one of the conforming masses...er...I suppose I just like what all you get for the money :-) Every now and then I'll post some music for you. You can listen to it for free if you follow the link and allow pop-ups (the player wont appear if your pop-up blocker is enabled). Here's what I'm listening to today:
Chicago -Greatest Hits Does Anybody Really Know What Time It Is?
Frou Frou -DetailsBreathe In
Cake-Comfort EagleComfort Eagle
Subscribe to:
Posts (Atom)
